banner


Angular 6 Web Api Okta Authentication Beginners Tutorial

In recent years, single page applications (SPAs) have become more and more popular. A SPA is a website that consists of just one page. That lone page acts as a container for a JavaScript application. The JavaScript is responsible for obtaining the content and rendering it within the container. The content is typically obtained from a web service and RESTful APIs have become the go-to choice in many situations. The part of the application making up the SPA is commonly known as the client or front-end, while the part responsible for the REST API is known as the server or back-end. In this tutorial, you will be developing a simple Angular single page app with a REST backend, based on Node and Express.

You'll be using Angular as it follows the MVC pattern and cleanly separates the View from the Models. It is straightforward to create HTML templates that are dynamically filled with data and automatically updated whenever the data changes. I have come to love this framework because it is very powerful, has a huge community and excellent documentation.

For the server, you will be using Node with Express. Express is a framework that makes it easy to create REST APIs by allowing to define code that runs for different requests on the server. Additional services can be plugged in globally, or depending on the request. There are a number of frameworks that build on top of Express and automate the task of turning your database models into an API. This tutorial will not make use of any of these in order to keep this focused.

Angular encourages the use of TypeScript. TypeScript adds typing information to JavaScript and, in my opinion, is the future of developing large scale applications in JavaScript. For this reason, you will be developing both client and server using TypeScript.

Here are the libraries you'll be using for the client and the server:

  • Angular: The framework used to build the client application
  • Okta for Authorisation: A plugin that manages single sign-on authorization using Okta, both on the client and the server
  • Angular Material: An angular plugin that provides out-of-the-box Material Design
  • Node: The actual server running the JavaScript code
  • Express: A routing library for responding to server requests and building REST APIs
  • TypeORM: A database ORM library for TypeScript

Start Your Basic Angular Client Application

Let's get started by implementing a basic client using Angular. The goal is to develop a product catalog which lets you manage products, their prices, and their stock levels. At the end of this section, you will have a simple application consisting of a top bar and two views, Home and Products. The Products view will not yet have any content and nothing will be password protected. This will be covered in the following sections.

To start you will need to install Angular. I will assume that you already have Node installed on your system and you can use the npm command. Type the following command into a terminal.

            npm              install              -g              @angular/cli@7.0.2                      

Depending on your system, you might need to run this command using sudo because it will install the package globally. The angular-cli package provides the ng command that is used to manage Angular applications. Once installed go to a directory of your choice and create your first Angular application using the following command.

Using Angular 7, this will prompt you with two queries. The first asks you if you want to include routing. Answer yes to this. The second query relates to the type of style sheets you want to use. Leave this at the default CSS.

ng new will create a new directory called MyAngularClient and populate it with an application skeleton. Let's take a bit of time to look at some of the files that the previous command created. At the src directory of the app, you will find a file index.html that is the main page of the application. It doesn't contain much and simply plays the role of a container. You will also see a style.css file. This contains the global style sheet that is applied throughout the application. If you browse through the folders you might notice a directory src/app containing five files.

            app-routing.module.ts app.component.css app.component.html app.component.ts app.component.spec.ts app.module.ts                      

These files define the main application component that will be inserted into the index.html. Here is a short description of each of the files:

  • app.component.css file contains the style sheets of the main app component. Styles can be defined locally for each component
  • app.component.html contains the HTML template of the component
  • app.component.ts file contains the code controlling the view
  • app.module.ts defines which modules your app will use
  • app-routing.module.ts is set up to define the routes for your application
  • app.component.spec.ts contains a skeleton for unit testing the app component

I will not be covering testing in this tutorial, but in real life applications, you should make use of this feature. Before you can get started, you will need to install a few more packages. These will help you to quickly create a nicely designed responsive layout. Navigate to the base directory of the client, MyAngularClient, and type the following command.

            npm i @angular/material@7.0.2 @angular/cdk@7.0.2 @angular/animations@7.0.1 @angular/flex-layout@7.0.0-beta.19                      

The @angular/material and @angular/cdk libraries provide components based on Google's Material Design, @angular/animations is used to provide smooth transitions, and @angular/flex-layout gives you the tools to make your design responsive.

Next, create the HTML template for the app component. Open src/app/app.component.html and replace the content with the following.

                          <mat-toolbar              color=              "primary"              class=              "expanded-toolbar"              >              <button              mat-button              routerLink=              "/"              >{{title}}</button>              <div              fxLayout=              "row"              fxShow=              "false"              fxShow.gt-sm              >              <button              mat-button              routerLink=              "/"              ><mat-icon>home</mat-icon></button>              <button              mat-button              routerLink=              "/products"              >Products</button>              <button              mat-button              *ngIf=              "!isAuthenticated"              (click)=              "login()"              >              Login              </button>              <button              mat-button              *ngIf=              "isAuthenticated"              (click)=              "logout()"              >              Logout              </button>              </div>              <button              mat-button              [mat-menu-trigger-for]=              "menu"              fxHide=              "false"              fxHide.gt-sm              >              <mat-icon>menu</mat-icon>              </button>              </mat-toolbar>              <mat-menu              x-position=              "before"              #menu              ="              matMenu              "              >              <button              mat-menu-item              routerLink=              "/"              ><mat-icon>home</mat-icon>              Home</button>              <button              mat-menu-item              routerLink=              "/products"              >Products</button>;              <button              mat-menu-item              *ngIf=              "!isAuthenticated"              (click)=              "login()"              >              Login              </button>              <button              mat-menu-item              *ngIf=              "isAuthenticated"              (click)=              "logout()"              >              Logout              </button>              </mat-menu>              <router-outlet></router-outlet>                      

The mat-toolbar contains the material design toolbar, whereas router-outlet is the container that will be filled by the router. The app.component.ts file should be edited to contain the following.

                          import              {              Component              }              from              '              @angular/core              '              ;              @              Component              ({              selector              :              '              app-root              '              ,              templateUrl              :              '              ./app.component.html              '              ,              styleUrls              :              [              '              ./app.component.css              '              ]              })              export              class              AppComponent              {              public              title              =              '              My Angular App              '              ;              public              isAuthenticated              :              boolean              ;              constructor              ()              {              this              .              isAuthenticated              =              false              ;              }              login              ()              {              }              logout              ()              {              }              }                      

This is the controller for the app component. You can see that it contains a property called isAuthenticated together with two methods login and logout. At the moment these don't do anything. They will be implemented in the next section which covers user authentication with Okta. Now define all the modules you will be using. Replace the contents of app.module.ts with the code below:

                          import              {              BrowserModule              }              from              '              @angular/platform-browser              '              ;              import              {              NgModule              }              from              '              @angular/core              '              ;              import              {              BrowserAnimationsModule              }              from              '              @angular/platform-browser/animations              '              ;              import              {              FlexLayoutModule              }              from              '              @angular/flex-layout              '              ;              import              {              MatButtonModule              ,              MatDividerModule              ,              MatIconModule              ,              MatMenuModule              ,              MatProgressSpinnerModule              ,              MatTableModule              ,              MatToolbarModule              }              from              '              @angular/material              '              ;              import              {              HttpClientModule              }              from              '              @angular/common/http              '              ;              import              {              FormsModule              }              from              '              @angular/forms              '              ;              import              {              AppRoutingModule              }              from              '              ./app-routing.module              '              ;              import              {              AppComponent              }              from              '              ./app.component              '              ;              @              NgModule              ({              declarations              :              [              AppComponent              ],              imports              :              [              AppRoutingModule              ,              BrowserModule              ,              BrowserAnimationsModule              ,              HttpClientModule              ,              FlexLayoutModule              ,              MatToolbarModule              ,              MatMenuModule              ,              MatIconModule              ,              MatButtonModule              ,              MatTableModule              ,              MatDividerModule              ,              MatProgressSpinnerModule              ,              FormsModule              ,              ],              providers              :              [],              bootstrap              :              [              AppComponent              ]              })              export              class              AppModule              {              }                      

Notice all the material design modules. The @angular/material library requires you to import a module for each type of component you wish to use in your app. Starting with Angular 7, the default application skeleton contains a separate file called app-routing.module.ts. Edit this to declare the following routes.

                          import              {              NgModule              }              from              '              @angular/core              '              ;              import              {              Routes              ,              RouterModule              }              from              '              @angular/router              '              ;              import              {              ProductsComponent              }              from              '              ./products/products.component              '              ;              import              {              HomeComponent              }              from              '              ./home/home.component              '              ;              const              routes              :              Routes              =              [              {              path              :              ''              ,              component              :              HomeComponent              },              {              path              :              '              products              '              ,              component              :              ProductsComponent              }              ];              @              NgModule              ({              imports              :              [              RouterModule              .              forRoot              (              routes              )],              exports              :              [              RouterModule              ]              })              export              class              AppRoutingModule              {              }                      

This defines two routes corresponding to the root path and to the products path. It also attaches the HomeComponent and the ProductsComponent to these routes. Create these components now. In the base directory of the Angular client, type the following commands.

            ng generate component Products ng generate component Home                      

This creates html, css, ts, and spec.ts files for each component. It also updates app.module.ts to declare the new components. Open up home.component.html in the src/app/home directory and paste the following content.

                          <div              class=              "hero"              >              <div>              <h1>Hello World</h1>              <p              class=              "lead"              >This is the homepage of your Angular app</p>              </div>              </div>                      

Include some styling in the home.component.css file too.

                          .hero              {              text-align              :              center              ;              height              :              90vh              ;              display              :              flex              ;              flex-direction              :              column              ;              justify-content              :              center              ;              font-family              :              sans-serif              ;              }                      

Leave the ProductsComponent empty for now. This will be implemented once you have created the back-end REST server and are able to fill it with some data. To make everything look beautiful only two little tasks remain. Copy the following styles into src/style.css

                          @import              "~@angular/material/prebuilt-themes/deeppurple-amber.css"              ;              body              {              margin              :              0              ;              font-family              :              sans-serif              ;              }              .expanded-toolbar              {              justify-content              :              space-between              ;              }              h1              {              text-align              :              center              ;              }                      

Finally, in order to render the Material Design Icons, add one line inside the <head> tags of the index.html file.

                          <link              href=              "https://fonts.googleapis.com/icon?family=Material+Icons"              rel=              "stylesheet"              >                      

You are now ready to fire up the Angular server and see what you have achieved so far. In the base directory of the client app, type the following command.

Then open your browser and navigate to http://localhost:4200.

Add Authentication to Your Node + Angular App

If you have ever developed web applications from scratch you will know how much work is involved just to allow users to register, verify, log on and log out of your application. Using Okta this process can be greatly simplified.

Before you begin, you'll need a free Okta developer account. Install the Okta CLI and run okta register to sign up for a new account. If you already have an account, run okta login. Then, run okta apps create. Select the default app name, or change it as you see fit. Choose Single-Page App and press Enter.

Use http://localhost:4200/callback for the Redirect URI and accept the default Logout Redirect URI of http://localhost:4200.

What does the Okta CLI do?

The Okta CLI will create an OIDC Single-Page App in your Okta Org. It will add the redirect URIs you specified and grant access to the Everyone group. It will also add a trusted origin for http://localhost:4200. You will see output like the following when it's finished:

              Okta application configuration: Issuer:    https://dev-133337.okta.com/oauth2/default Client ID: 0oab8eb55Kb9jdMIr5d6                          

NOTE: You can also use the Okta Admin Console to create your app. See Create an Angular App for more information.

To implement authentication into the client, install the Okta library for Angular.

            npm              install              @okta/okta-angular@3.0.1              --save-exact                      

In app.module.ts import OKTA_CONFIG and OktaAuthModule.

                          import              {              OKTA_CONFIG              ,              OktaAuthModule              }              from              '              @okta/okta-angular              '              ;                      

Then, define your Okta configuration, replacing the {...} placeholders with the values in your terminal.

                          const              oktaConfig              =              {              issuer              :              '                                                https://{yourOktaDomain}                /oauth2/default              '              ,              clientId              :              '              {clientId}              '              ,              redirectUri              :              window              .              location              .              origin              +              '              /callback              '              };                      

In the @NgModule, import OktaAuthModule and provide OKTA_CONFIG with your settings.

                          @              NgModule              ({              imports              :              [              ...              OktaAuthModule              ],              providers              :              [              {              provide              :              OKTA_CONFIG              ,              useValue              :              oktaConfig              }              ],              })                      

The code above makes the Okta Authentication Module available in your application. Use it in app.component.ts, and import the service.

                          import              {              OktaAuthService              }              from              '              @okta/okta-angular              '              ;                      

Modify the constructor to inject the service and subscribe to it.

                          constructor              (              public              oktaAuth              :              OktaAuthService              )              {              this              .              oktaAuth              .              $authenticationState              .              subscribe              (              (              isAuthenticated              :              boolean              )              =>              this              .              isAuthenticated              =              isAuthenticated              );              }                      

Now, any changes in the authentication status will be reflected in the isAuthenticated property. You will still need to initialize it when the component is loaded. Create a ngOnInit method and add implements OnInit to your class definition

                          import              {              Component              ,              OnInit              }              from              '              @angular/core              '              ;              ...              export              class              AppComponent              implements              OnInit              {              ...              async              ngOnInit              ()              {              this              .              isAuthenticated              =              await              this              .              oktaAuth              .              isAuthenticated              ();              }              }                      

Finally, implement the login and logout method to react to the user interface and log the user in or out.

                          async              login              ()              {              await              this              .              oktaAuth              .              signInWithRedirect              ();              }              async              logout              ()              {              await              this              .              oktaAuth              .              signOut              ();              }                      

In the routing module, you need to register the route that will be used for the login request. Open app-routing.module.ts and import OktaCallbackComponent and OktaAuthGuard.

                          import              {              OktaCallbackComponent              ,              OktaAuthGuard              }              from              '              @okta/okta-angular              '              ;                      

Add another route to the routes array.

                          {              path              :              '              callback              '              ,              component              :              OktaCallbackComponent              }                      

This will allow the user to log in using the Login button. To protect the Products route from unauthorized access, add the following line to the products route.

                          {              path              :              '              products              '              ,              component              :              ProductsComponent              ,              canActivate              :              [              OktaAuthGuard              ]              }                      

That's all there is to it. Now, when a user tries to access the Products view, they will be redirected to the Okta login page. Once logged on, the user will be redirected back to the Products view.

Implement a Node REST API

The next step is to implement a server based on Node and Express that will store product information. This will use a number of smaller libraries to make your life easier. To develop in TypeScript, you'll need typescript and tsc. For the database abstraction layer, you will be using TypeORM. This is a convenient library that injects behavior into TypeScript classes and turns them into database models. Create a new directory to contain your server application, then run the following command in it.

Answer all the questions, then run:

            npm              install              --save-exact              express@4.17.1 @types/express@4.17.11 @okta/jwt-verifier@2.1.0              \              express-bearer-token@2.4.0 tsc@1.20150623.0 typescript@4.2.4              \              typeorm@0.2.32 sqlite3@5.0.2 cors@2.8.5 @types/cors@2.8.10                      

I will not cover all these libraries in detail, but you will see that @okta/jwt-verifier is used to verify JSON Web Tokens and authenticate them.

In order to make TypeScript work, create a file tsconfig.json and paste in the following content.

                          {                                          "compilerOptions"              :                                          {                                          "target"              :                                          "es6"              ,                                          "module"              :                                          "commonjs"              ,                                          "outDir"              :                                          "dist"              ,                                          "experimentalDecorators"              :                                          true              ,                                          "emitDecoratorMetadata"              :                                          true                                          },                                          "include"              :                                          [                                          "src/**/*.ts"                                          ],                                          "exclude"              :                                          [                                          "node_modules"                                          ]                                          }                                                  

The first step in creating the server is to create a database model for the product. Using TypeORM this is straightforward. Create a subdirectory src and inside that create a file model.ts. Paste the following content.

                          import              {              Entity              ,              PrimaryGeneratedColumn              ,              Column              ,              createConnection              ,              Connection              ,              Repository              }              from              '              typeorm              '              ;              @              Entity              ()              export              class              Product              {              @              PrimaryGeneratedColumn              ()              id              :              number              ;              @              Column              ()              name              :              string              ;              @              Column              ()              sku              :              string              ;              @              Column              (              '              text              '              )              description              :              string              ;              @              Column              ()              price              :              number              ;              @              Column              ()              stock              :              number              ;              }                      

The TypeORM annotations turn the class definition into a database model. I love the TypeORM project because of its ease of use and the wide variety of SQL and NoSQL database connectors that are supported. I suggest that you check out the documentation at https://github.com/typeorm/typeorm.

You will also need to get access to a repository of product. Also in the model.ts file add the following.

                          let              connection              :              Connection              ;              export              async              function              getProductRepository              ():              Promise              <              Repository              <              Product              >>              {              if              (              connection              ===              undefined              )              {              connection              =              await              createConnection              ({              type              :              '              sqlite              '              ,              database              :              '              myangularapp              '              ,              synchronize              :              true              ,              entities              :              [              Product              ],              });              }              return              connection              .              getRepository              (              Product              );              }                      

Note that this uses SQLite for simplicity here. In a real-world scenario, you should replace this with a database connector of your choice.

Next, create a file called product.ts. This file will contain the logic for all the routes for the CRUD operations on Products.

                          import              {              NextFunction              ,              Request              ,              Response              ,              Router              }              from              '              express              '              ;              import              {              getProductRepository              ,              Product              }              from              '              ./model              '              ;              export              const              router              :              Router              =              Router              ();              router              .              get              (              '              /product              '              ,              async              function              (              req              :              Request              ,              res              :              Response              ,              next              :              NextFunction              )              {              try              {              const              repository              =              await              getProductRepository              ();              const              allProducts              =              await              repository              .              find              ();              res              .              send              (              allProducts              );              }              catch              (              err              )              {              return              next              (              err              );              }              });              router              .              get              (              '              /product/:id              '              ,              async              function              (              req              :              Request              ,              res              :              Response              ,              next              :              NextFunction              )              {              try              {              const              repository              =              await              getProductRepository              ();              const              product              =              await              repository              .              findOne              (              req              .              params              .              id              );              res              .              send              (              product              );              }              catch              (              err              )              {              return              next              (              err              );              }              });              router              .              post              (              '              /product              '              ,              async              function              (              req              :              Request              ,              res              :              Response              ,              next              :              NextFunction              )              {              try              {              const              repository              =              await              getProductRepository              ();              const              product              =              new              Product              ();              product              .              name              =              req              .              body              .              name              ;              product              .              sku              =              req              .              body              .              sku              ;              product              .              description              =              req              .              body              .              description              ;              product              .              price              =              Number              .              parseFloat              (              req              .              body              .              price              );              product              .              stock              =              Number              .              parseInt              (              req              .              body              .              stock              );              const              result              =              await              repository              .              save              (              product              );              res              .              send              (              result              );              }              catch              (              err              )              {              return              next              (              err              );              }              });              router              .              post              (              '              /product/:id              '              ,              async              function              (              req              :              Request              ,              res              :              Response              ,              next              :              NextFunction              )              {              try              {              const              repository              =              await              getProductRepository              ();              const              product              =              await              repository              .              findOne              (              req              .              params              .              id              );              product              .              name              =              req              .              body              .              name              ;              product              .              sku              =              req              .              body              .              sku              ;              product              .              description              =              req              .              body              .              description              ;              product              .              price              =              Number              .              parseFloat              (              req              .              body              .              price              );              product              .              stock              =              Number              .              parseInt              (              req              .              body              .              stock              );              const              result              =              await              repository              .              save              (              product              );              res              .              send              (              result              );              }              catch              (              err              )              {              return              next              (              err              );              }              });              router              .              delete              (              '              /product/:id              '              ,              async              function              (              req              :              Request              ,              res              :              Response              ,              next              :              NextFunction              )              {              try              {              const              repository              =              await              getProductRepository              ();              await              repository              .              delete              (              req              .              params              .              id              );              res              .              send              (              '              OK              '              );              }              catch              (              err              )              {              return              next              (              err              );              }              });                      

This file is somewhat lengthy but does not contain anything surprising. Product objects are created and saved into or deleted from the database.

Let's turn our attention to authentication again. You will want to make sure that only authenticated users can access the service. Create a file called auth.ts and paste the following.

                          import              {              Request              ,              Response              ,              NextFunction              }              from              '              express              '              ;              const              OktaJwtVerifier              =              require              (              '              @okta/jwt-verifier              '              );              const              oktaJwtVerifier              =              new              OktaJwtVerifier              ({              clientId              :              '              {YourClientId}              '              ,              issuer              :              '                                                https://{yourOktaDomain}                /oauth2/default              '              });              export              async              function              oktaAuth              (              req              :              Request              ,              res              :              Response              ,              next              :              NextFunction              )              {              try              {              const              token              =              (              req              as              any              ).              token              ;              if              (              !              token              )              {              return              res              .              status              (              401              ).              send              (              '              Not Authorized              '              );              }              const              jwt              =              await              oktaJwtVerifier              .              verifyAccessToken              (              token              ,              '              api://default              '              );              // @ts-ignore              req              .              user              =              {              uid              :              jwt              .              claims              .              uid              ,              email              :              jwt              .              claims              .              sub              };              next              ();              }              catch              (              err              )              {              return              res              .              status              (              401              ).              send              (              err              .              message              );              }              }                      

Just as in the client application yourOktaDomain should be replaced by the development domain and YourClientId has to be replaced by your application client ID. The oktaJwtVerifier instance takes a JWT token and verifies it, as well as the audience (api://default).

If successful, the user id and email will be stored in req.user. Otherwise, the server will respond with a 401 status code. The final piece to complete the server is the main entry point that actually starts the server and registers the middleware you have defined so far. Create a file server.ts with the following content.

                          import              *              as              express              from              '              express              '              ;              import              *              as              cors              from              '              cors              '              ;              import              *              as              bodyParser              from              '              body-parser              '              ;              const              bearerToken              =              require              (              '              express-bearer-token              '              );              import              {              router              as              productRouter              }              from              '              ./product              '              import              {              oktaAuth              }              from              '              ./auth              '              const              app              =              express              ()              .              use              (              cors              ())              .              use              (              bodyParser              .              json              ())              .              use              (              bearerToken              ())              .              use              (              oktaAuth              )              .              use              (              productRouter              );              app              .              listen              (              4201              ,              ()              =>              {              return              console              .              log              (              '              My Node App listening on port 4201              '              );              });                      

To compile the TypeScript run the command

Then, if you want to start the server, simply run:

Finish Your Angular Client

Now that the server is complete let's finish off the client. The first step is to create a class that contains the Product data. This class is similar to the Product class in the server application but without the TypeORM annotations. It will be contained in a file called product.ts.

                          export              class              Product              {              id              ?:              string              ;              name              :              string              ;              sku              :              string              ;              description              :              string              ;              price              :              number              ;              stock              :              number              ;              }                      

Save this file in the same directory as the products component. It is best to encapsulate the access to the REST API in a separate service. Create a Products service by running the command below.

            ng generate service products/Products                      

This will create a file called product.service.ts in the src/app/products directory. Fill it with the following content.

                          import              {              Injectable              }              from              '              @angular/core              '              ;              import              {              HttpClient              }              from              '              @angular/common/http              '              ;              import              {              OktaAuthService              }              from              '              @okta/okta-angular              '              ;              import              {              Product              }              from              '              ./product              '              ;              const              baseUrl              =              '              http://localhost:4201              '              ;              @              Injectable              ({              providedIn              :              '              root              '              })              export              class              ProductsService              {              constructor              (              public              oktaAuth              :              OktaAuthService              ,              private              http              :              HttpClient              )              {              }              private              async              request              (              method              :              string              ,              url              :              string              ,              data              ?:              any              ,              responseType              ?:              any              )              {              const              token              =              await              this              .              oktaAuth              .              getAccessToken              ();              console              .              log              (              '              request                            '              +              JSON              .              stringify              (              data              ));              const              result              =              this              .              http              .              request              (              method              ,              url              ,              {              body              :              data              ,              responseType              :              responseType              ||              '              json              '              ,              observe              :              '              body              '              ,              headers              :              {              Authorization              :              `Bearer                            ${              token              }              `              }              });              return              new              Promise              <              any              >              ((              resolve              ,              reject              )              =>              {              result              .              subscribe              (              resolve              as              any              ,              reject              as              any              );              });              }              getProducts              ()              {              return              this              .              request              (              '              get              '              ,              `              ${              baseUrl              }              /product`              );              }              getProduct              (              id              :              string              )              {              return              this              .              request              (              '              get              '              ,              `              ${              baseUrl              }              /product/              ${              id              }              `              );              }              createProduct              (              product              :              Product              )              {              console              .              log              (              '              createProduct                            '              +              JSON              .              stringify              (              product              ));              return              this              .              request              (              '              post              '              ,              `              ${              baseUrl              }              /product`              ,              product              );              }              updateProduct              (              product              :              Product              )              {              console              .              log              (              '              updateProduct                            '              +              JSON              .              stringify              (              product              ));              return              this              .              request              (              '              post              '              ,              `              ${              baseUrl              }              /product/              ${              product              .              id              }              `              ,              product              );              }              deleteProduct              (              id              :              string              )              {              return              this              .              request              (              '              delete              '              ,              `              ${              baseUrl              }              /product/              ${              id              }              `              ,              null              ,              '              text              '              );              }              }                      

The ProductsService contains one public method for each route of the REST API. The HTTP request is encapsulated in a separate method. Note how the request always contains a Bearer token obtained from the OktaAuthService. This is the token used by the server to authenticate the user.

Now the ProductsComponent can be implemented. The following code will do the trick.

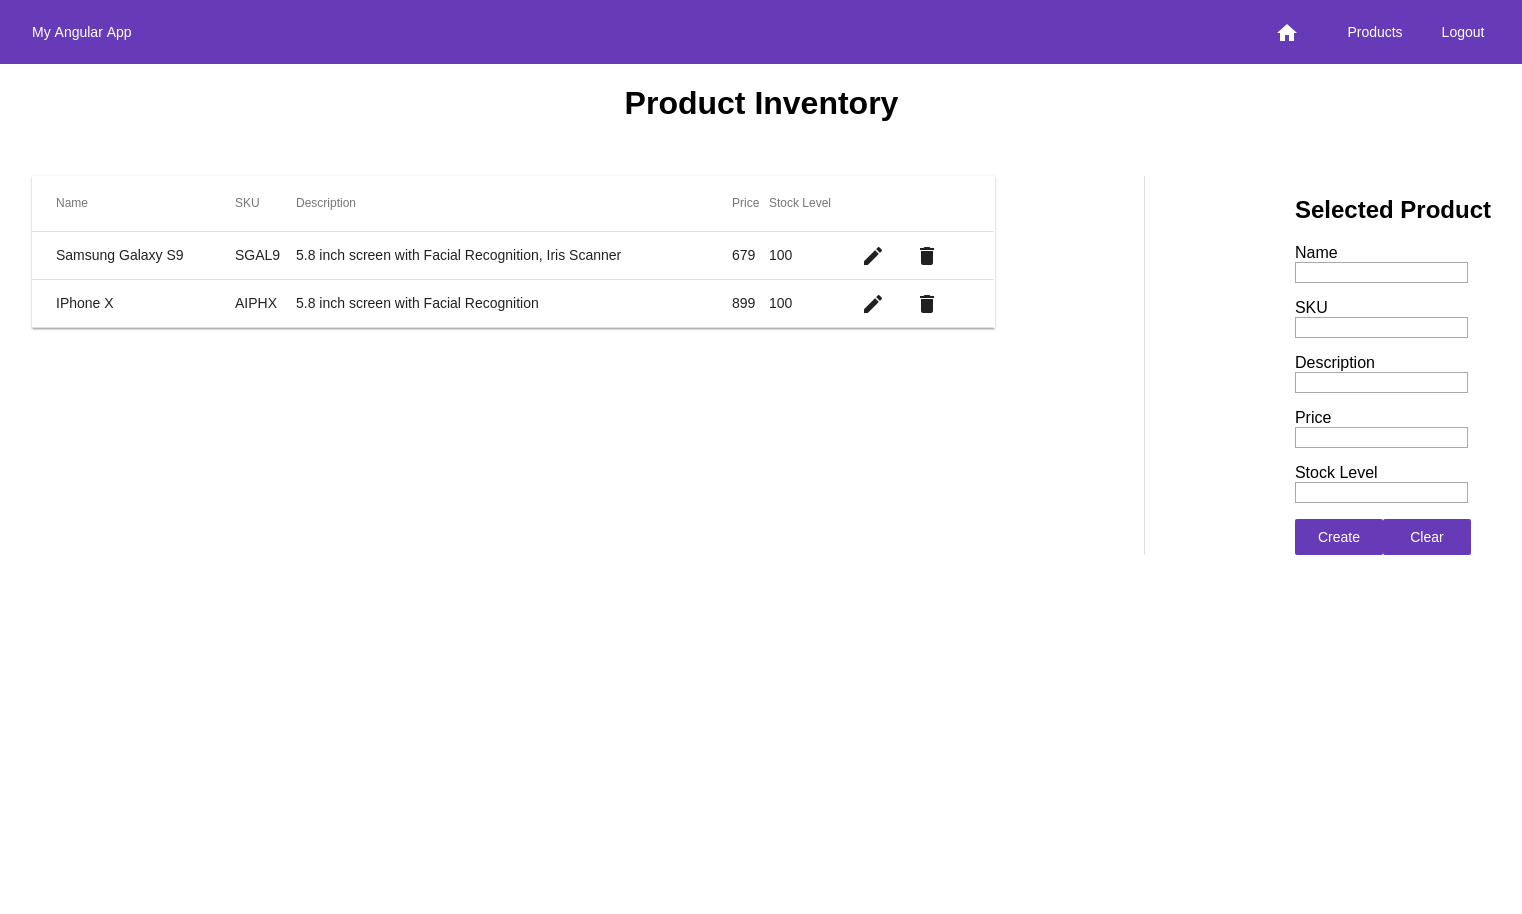
                          import              {              Component              ,              OnInit              }              from              '              @angular/core              '              ;              import              {              MatTableDataSource              }              from              '              @angular/material              '              ;              import              {              ProductsService              }              from              '              ./products.service              '              ;              import              {              Product              }              from              '              ./product              '              ;              @              Component              ({              selector              :              '              app-products              '              ,              templateUrl              :              '              ./products.component.html              '              ,              styleUrls              :              [              '              ./products.component.css              '              ]              })              export              class              ProductsComponent              implements              OnInit              {              displayedColumns              :              string              []              =              [              '              name              '              ,              '              sku              '              ,              '              description              '              ,              '              price              '              ,              '              stock              '              ,              '              edit              '              ,              '              delete              '              ];              dataSource              =              new              MatTableDataSource              <              any              >              ();              selectedProduct              :              Product              =              new              Product              ();              loading              =              false              ;              constructor              (              public              productService              :              ProductsService              )              {              }              ngOnInit              ()              {              this              .              refresh              ();              }              async              refresh              ()              {              this              .              loading              =              true              ;              const              data              =              await              this              .              productService              .              getProducts              ();              this              .              dataSource              .              data              =              data              ;              this              .              loading              =              false              ;              }              async              updateProduct              ()              {              if              (              this              .              selectedProduct              .              id              !==              undefined              )              {              await              this              .              productService              .              updateProduct              (              this              .              selectedProduct              );              }              else              {              await              this              .              productService              .              createProduct              (              this              .              selectedProduct              );              }              this              .              selectedProduct              =              new              Product              ();              await              this              .              refresh              ();              }              editProduct              (              product              :              Product              )              {              this              .              selectedProduct              =              product              ;              }              clearProduct              ()              {              this              .              selectedProduct              =              new              Product              ();              }              async              deleteProduct              (              product              :              Product              )              {              this              .              loading              =              true              ;              if              (              confirm              (              `Are you sure you want to delete the product                            ${              product              .              name              }              . This cannot be undone.`              ))              {              await              this              .              productService              .              deleteProduct              (              product              .              id              );              }              await              this              .              refresh              ();              }              }                      

The layout, in products.component.html, showing the product consists of two parts. The first part uses a mat-table component to display a list of products. The second part shows a form in which the user can edit a new or existing product.

                          <h1              class=              "h1"              >Product Inventory</h1>              <div              fxLayout=              "row"              fxLayout.xs=              "column"              fxLayoutAlign=              "space-between stretch"              class=              "products"              >              <table              mat-table              fxFlex=              "100%"              fxFlex.gt-sm=              "66%"              [dataSource]=              "dataSource"              class=              "mat-elevation-z1"              >              <ng-container              matColumnDef=              "name"              >              <th              mat-header-cell              *matHeaderCellDef              >              Name</th>              <td              mat-cell              *matCellDef=              "let product"              >              {{product.name}}</td>              </ng-container>              <ng-container              matColumnDef=              "sku"              >              <th              mat-header-cell              *matHeaderCellDef              >              SKU</th>              <td              mat-cell              *matCellDef=              "let product"              >              {{product.sku}}</td>              </ng-container>              <ng-container              matColumnDef=              "description"              >              <th              mat-header-cell              *matHeaderCellDef              >              Description</th>              <td              mat-cell              *matCellDef=              "let product"              >              {{product.description}}</td>              </ng-container>              <ng-container              matColumnDef=              "price"              >              <th              mat-header-cell              *matHeaderCellDef              >              Price</th>              <td              mat-cell              *matCellDef=              "let product"              >              {{product.price}}</td>              </ng-container>              <ng-container              matColumnDef=              "stock"              >              <th              mat-header-cell              *matHeaderCellDef              >              Stock Level</th>              <td              mat-cell              *matCellDef=              "let product"              >              {{product.stock}}</td>              </ng-container>              <ng-container              matColumnDef=              "edit"              >              <th              mat-header-cell              *matHeaderCellDef              ></th>              <td              mat-cell              *matCellDef=              "let product"              >              <button              mat-icon-button              (click)=              "editProduct(product)"              >              <mat-icon>edit</mat-icon>              </button>              </td>              </ng-container>              <ng-container              matColumnDef=              "delete"              >              <th              mat-header-cell              *matHeaderCellDef              ></th>              <td              mat-cell              *matCellDef=              "let product"              >              <button              mat-icon-button              (click)=              "deleteProduct(product)"              >              <mat-icon>delete</mat-icon>              </button>              </td>              </ng-container>              <tr              mat-header-row              *matHeaderRowDef=              "displayedColumns"              ></tr>              <tr              mat-row              *matRowDef=              "let row; columns: displayedColumns;"              ></tr>              </table>              <mat-divider              fxShow=              "false"              fxShow.gt-sm              [vertical]=              "true"              ></mat-divider>              <div>              <h2>Selected Product</h2>              <label>Name              <input              type=              "text"              [(ngModel)]=              "selectedProduct.name"              >              </label>              <label>SKU              <input              type=              "text"              [(ngModel)]=              "selectedProduct.sku"              >              </label>              <label>Description              <input              type=              "text"              [(ngModel)]=              "selectedProduct.description"              >              </label>              <label>Price              <input              type=              "text"              [(ngModel)]=              "selectedProduct.price"              >              </label>              <label>Stock Level              <input              type=              "text"              [(ngModel)]=              "selectedProduct.stock"              >              </label>              <button              mat-flat-button              color=              "primary"              (click)=              "updateProduct()"              >{{(selectedProduct.id!==undefined)?'Update':'Create'}}</button>              <button              mat-flat-button              color=              "primary"              (click)=              "clearProduct()"              >Clear</button>              </div>              <div              class=              "loading"              *ngIf=              "loading"              >              <mat-spinner></mat-spinner>              </div>              </div>                      

Finally, add a bit of styling in products.component.css to the layout.

                          .products              {              padding              :              2rem              ;              }              label              ,              input              {              display              :              block              ;              }              label              {              margin-bottom              :              1rem              ;              }              .loading              {              position              :              absolute              ;              display              :              flex              ;              justify-content              :              center              ;              align-content              :              center              ;              width              :              100%              ;              height              :              100%              ;              background-color              :              rgba              (              255              ,              255              ,              255              ,              0.8              );              }                      

When all is done, you can start the client and the server up and test your application. Just to repeat, in the directory containing the server, run:

And in the client directory, run:

Your application should look somewhat like the following

Product Inventory

Learn more About Angular, Node, and Express

In this tutorial, I have guided you through the development of a single page web application using Angular and Node. Using just a few lines of code you were able to implement user authentication for the client and the server. Angular makes use of TypeScript which is a superset of the JavaScript language and adds type information. TypeScript makes for more stable code and that is why I decided to also implement the Node/Express server using this language. If you are not yet familiar with TypeScript, check out this great introduction by Todd Motto. He also has some good articles on Angular.

The complete code of this tutorial can be found on GitHub.

If you're ready to learn more about Angular, or Node/Express, we have some other resources for you to check out:

  • Simple Node Authentication
  • Build a Basic CRUD App with Node and React
  • Build a Simple API Service with Express and GraphQL
  • Angular 6 - What's New and Why Upgrade?
  • Build a Basic CRUD App with Angular 7 and Spring Boot

And as always, we'd love to have you follow us for more cool content and updates from our team. You can find us on Twitter @oktadev, on Facebook, and LinkedIn.

Angular 6 Web Api Okta Authentication Beginners Tutorial

Source: https://developer.okta.com/blog/2018/10/30/basic-crud-angular-and-node

0 Response to "Angular 6 Web Api Okta Authentication Beginners Tutorial"

Post a Comment

Iklan Atas Artikel

Iklan Tengah Artikel 1

Iklan Tengah Artikel 2

Iklan Bawah Artikel